Carol R. Eaton Designs

Carol R. Eaton Designs

FABRIC FOR SALE: click on pages below!

Wednesday, May 30, 2012

Ice Cube Dying - A Desire for Burgundy!

I was trying to create a Burgundy color which would have been easier using the typical dye immersion method. However, you know I'm hooked on ice cube dying so I thought I'd give it a go. I combined green, black and red with the idea that it wouldn't exactly be a solid color. Also I wasn't exactly sure how much of the colors would even blend.


Here are the results:


The colors are hard to capture on the computer but "live" the piece is very deep with bright, contrasting rich colors. I'm learning that the more contrast in color choices the more dramatic the ice cube method results are!


Monday, May 28, 2012

4 Techniques!

Q: How can you tell when the fabric done?
A: When it feels right!

I started with ice cube dying but it was a little pale. I added confetti dying using blue but it still needed more. I went in the yard and picked some leaves and ferns. Using silk screen ink I stamped the natural leaves onto the piece... but it wasn't quite finished. Lastly I took some yellow and orange paint and added some here and there.

Finally, it felt right!


I'm thinking a large single dark flower might work with this as the background fabric... what would you do with it?!

Thursday, May 24, 2012

More Confetti Dying Fun!

I learn something each time I experiment with this technique. This session the conditions were perfect - no wind to blow the soggy wet dye drenched fabric back on me - defiantly a bonus!

In this piece I used fuchsia, orange and turquoise. I was curious about how the colors would blend and as you can see I came out with greens, yellows and purples! I just love surprises...


Wednesday, May 23, 2012

Combining Ice Cube Dying with Fabric Paints!

I dyed about 6 yards of fabric over the weekend using the ice cube method. I usually dye in old round pails ... really old! They're getting pretty beat up so when I spied some fun rectangle shaped containers at a tag sale I scooped them up. I discovered they're perfect with one exception; they are larger than my old pails so 1-yard fabric pieces don't quite take up the full volume of the container.

When I removed the fabric from the dye bath there was more white space than I expected because of the container size; the dye didn't get a chance to meander all over the fabric. The fabric was still nice  - just different. Some pieces I left alone but some pieces needed more color. Rather than using more dye I decided to pull out my fabric paints from Dharma Trading. I was happy with the results and liked the combinations of techniques.

Give it a try!


Using one of my favorite stamps I added color randomly to fill in some (not all) of the white spaces.

You'll need to dry and heat set the paint.

The completed piece looks more interesting with the paint and the gold shimmer adds some fun!


Saturday, May 12, 2012

Happy Mother's Day!

I'm wishing every mom a very special Mother's Day!
The world could not exist without you!

Thursday, May 10, 2012

Comparing Dying Techniques

I continue to be excited by surface design and at this point I'm starting to take a more focused approach to my sessions. In this segment I wanted to compare 3 different techniques using the same colors just to see how they would compare to each other. My examples are below; you'll compare confetti dying, ice cube dying and then the typical dye immersion method. This was a good learning experience and each time I dye I discover something new!

I hope you enjoy the results. I found it amazing that the same colors were used because the results were so different. I have a favorite method but I won't say anything so you can take a look and make your own decisions!

The colors used below are yellow and wet sands


Confetti Dying - Yellow & Wet Sands

Ice Cube Dying - Yellow & Wet Sands

Dye Immersion - Yellow & Wet Sands
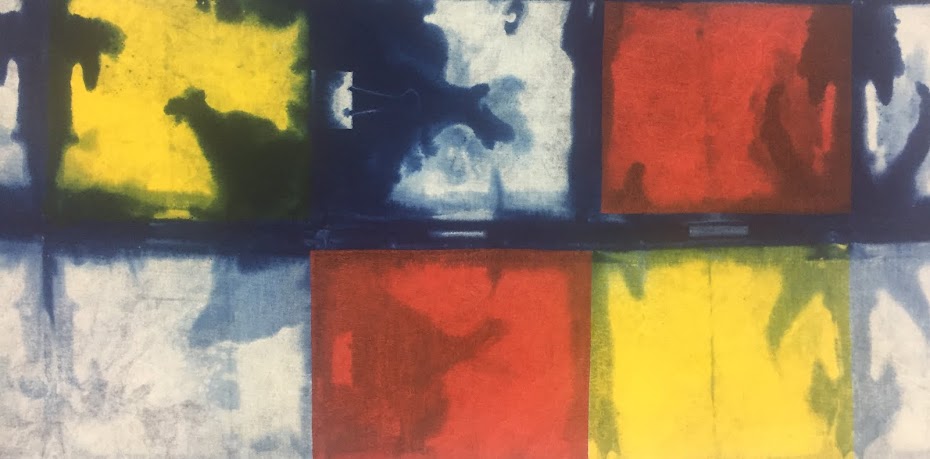
 The below fabrics combine Blue, Red and Yellow


Confetti Dying - Blue, Red & Yellow

Ice Cube Dying - Blue, Red & Yellow

Dye Immersion - Blue, Red & Yellow

The below colors are Yellow and Red


Confetti Dying - Yellow & Red

Ice Cube Dying - Yellow & Red

Dye Immersion - Yellow & Red

Drippings - Yellow & Red
I placed fabric below the confetti dying piece as it was hung and this is the result of the excess dye dripping down. It was another unexpected delight!

As you can see the technique makes a huge difference in how the colors blend and the results are pretty unique. Did you have a favorite? Mine is the ice cube dying... the way the colors come out with such depth is like opening a present every time I rinse the fabric!