Carol R. Eaton Designs

Carol R. Eaton Designs

FABRIC FOR SALE: click on pages below!

Thursday, July 31, 2014

Mud Cloth!

Bogolanfini or Bogoan (mud cloth) is handmade Malian cotton fabric dyed with fermented mud! Traditionally men wove the cloth and woman dyed it although in today's economic climate men have taken over the majority of the process. 

The fabric is woven on narrow looms and then pieced together to create full cloths. In the below detail shot you can see the individual strips and the wonderful texture of the course cloth. The hourglass symbolizes "time will tell". 

The cloth is first soaked in a dye bath made from mashed and boiled leaves of the n'gallama tree which turns the cloth yellow. The mud is collected from riverbeds and fermented at times for up to a year.The designs are added by carefully applying the special mud using a piece of metal or wood. The combination of the mud and cloth creates a chemical reaction so when the mud is washed off the brown color remains.
The final step is to wash off the yellow n'gallama dye from the unpainted parts of the cloth using soap and bleach. Although this cloth doesn't have any white in the design many of the designs incorporate white which is apparent once the cloth is bleached. The Smithsonian Museum has a great mud cloth introduction showing the process - check it out 
To maintain the integrity of my treasured piece of mud cloth I chose to simply create a sleeve on each end to hang as is. I love the cloth and it makes me smile when I think of how it was created and the many hands it took to reach me. 

 My wonderful piece of mud cloth came from Wendy Mamattah's Esty shop. Wendy has a full line of fabrics she imports directly from Africa. I discovered Wendy due to our mutual love of fabric! She was looking for a piece that reminded her of that special glow of the African sun. Please take a moment to check out Wendy's Etsy shop and her web site at Braid and Stitch.

Wednesday, July 30, 2014

How To Hang Art Cloth!

I love taking a favorite piece of art cloth and hanging it on the wall. The fabric is in it's purest form with minimal additional embellishments. I absolutely love quilted wall art but sometimes you come across a special piece of fabric that you simply can't cut into little bits. In those cases hemming and hanging is a great way to display your art cloth.
The first decision to make is whether or not to "fussy" cut the piece for maximum impact. For this ice dyed piece my favorite part was right in the middle and I preferred to have a rectangle shaped piece so I sliced off the edges. 

The next step was to hem the sides. I pressed a 1/4" and then folded over again to sew down. 
For the bottom finished edge I pressed the raw edge a 1/2" and folded over 2" to create a sleeve. I like to slip a small dowel through the bottom to add a small amount of weight to keep the art cloth hanging properly. 
 The top finished edge was handled in the same way with the exception of each end. I folded and pressed the outside corner as shown above. 

 I sewed along the along to entire length so the seam looked continuous from the front. 
I used a small dowel with eyelets on the ends to prepare for hanging. The final step was to string nylon fishing line through the eyelets. The clear line is great for minimal distraction once the art cloth is hung. 


If you give this a try or have some other tips I'd love to hear from you! 

Monday, July 28, 2014

Custom Fabric Panels!


I was asked to create two panels using the color green and a natural theme. This happens to be two of my favorite things so it was a pleasure to work on this project. The cotton was painted and sun printed with cherry tree leaves. 
I'd say we have a satisfied customer!
The fabric was stretched over canvas panels and each 24" X 34". 
Have you tried stretching fabric over artist canvas or old frames? It's a great option for hanging art cloth.  

Wednesday, July 23, 2014

New Fabrics For Sale!

I just updated my fabric inventory (long overdue!). The new fabrics incorporate ice dyeing, confetti dyeing, sun printing, hand painted fabrics and my new passion - indigo!

Please click on any of the above tabs to see what new fabrics are available and if any need to move over to your stash please click here or on the individual page to place your order!

Don't see what you'd like? Contact me and we can talk about how to create a custom piece just for you! 

Monday, July 21, 2014

Surface Design Play Date!

The weather was perfect and the company supreme! The Connecticut Fiber Arts Collective got together for a surface design play date! Our group was long overdue for some getting messy time. 
Members: Diane Cadrain, Linda Martin, Karen Loprete, Rosalind Spann, Christina Blais, Antoinia Torres, Me and Wanda Seldon. Taking the photo is Mary Lachman.
The group got busy creating one of a kind fabrics using many techniques: ice dyeing, confetti dyeing, painting, and sun-printing. We manipulated the fabric for interesting results and I can't wait to see what these fabulous artists create with their treasures! 
Fun - fun - fun!

Wanda Seldon thinking about the next color to add to her ice dyed piece.

Diane Cadrain's confetti dyed piece!

Diane Cadrain and Mary Lachman wrapping fabric Shibori style
to dip into the indigo vat! 

Antonia Torres using a stencil!

Rosalind Spann and Karen Loprete discussing techniques!  

Wanda Seldon's dramatic confetti dyed piece! 

Linda Martin is hooked on fabric painting! 

Rosalind Spann painting with dye!

Mary Lachman and Karen Loprete experimenting with sun-printing!

Rosalind so generously shared her newly created rust fabric with me... gimme... gimme... gimme... yippee! 

Christina Blais was on the hunt for yellow fabric so she created her own! 
The Connecticut Fiber Arts Collective exhibits their art work all around the state and currently showing "Jazz Tones" at the Pearl Street Gallery in Hartford, CT. Click here for the artists comments sbout how they approach the creative process.  

Friday, July 18, 2014

Managing an Indigo Vat

I have a "thing" about indigo... I read about it... I watch YouTube clips... yah I've got it bad! When I saw Dharma Trading offered pre-reduced indigo crystals I had to go for it and started my own vat. I love tending to it; if it's a little too blue I shake in some Thiourea Dioxide or perhaps the color is off so more dried crystals are added. I'm still learning and having a great time. 


So now that I'm confident in producing a luscious indigo color I need to focus on how I want to use it. The first imagine people usually have when thinking about indigo is the Shibori technique... surely that's just the tip of the ice berg... right?! 
What will you be?

New life for an old shirt!

A twisted... thing!

Some completed experiments. 
I'd like a darker color and it's my understanding that I can simply repeat the "dunking" process... off to create more! 

Wednesday, July 16, 2014

When Black is Blue!

Achieving a really great deep dark black remains a challenge for me! Since I don't seem to be able to get the results I want I decided to explore the differences in the black dyes from my stash. I pulled out 2 different blacks; silk black and new black by ProChemical. The best way to understand the properties of a dye recipe is to use the Confetti Technique. This method calls for the dye to be placed in a strainer and sprinkled across the surface of the fabric. Because the dye is not immersed in water the color particles that make up a dye separate and I can see what colors dominate the recipe.

My most common result is a blue black. 

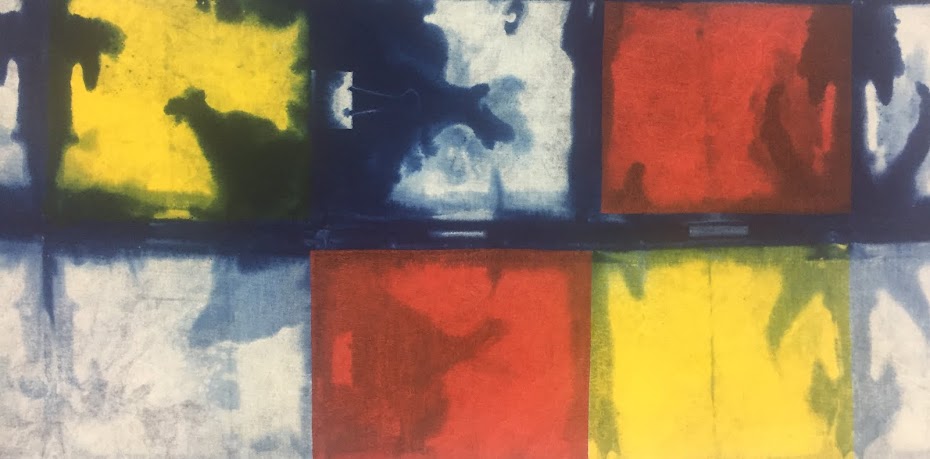
I expected to see blue particles and was surprised to see yellow and red! 

Next I folded the damp fabric (soaked in soda ash and water for 30 minutes). This time I used the "silk" black.

The silk black definitely has reds/browns in the recipe.

Switching back to the "new" black I discovered it reads a deeper black but still feels a little "blue".

I have a couple more blacks to experiment with and it's interesting to see the subtle nuances between the recipes. I've always thought of black as an "easy" color because it's so... black... kinda simple. I know better now and have a new respect for the color! I will continue to work and explore to find the "perfect" black.

Thursday, July 10, 2014

Ice Dyeing Vintage Textiles

I'm of an age where my folks and their generation are clearing the clutter so to speak. They've started to give away items collected over a lifetime to simplify their lives. Recently my mom was helping her dear sweet friend Ethel consolidate her space when they came across some doilies and crocheted table runners made long ago. About the same time my mother in law gave me a pile of forgotten fabrics she'd discovered tucked away under the eves. 

It was fun poking through my treasures and I couldn't resist tossing a few into the ice dye. Some of you may feel the vintage integrity is lost by dyeing but my perspective is that I'm adding a new chapter to their story!

The doily absorbed the dye well and I think the soft colors keep the vintage look intact. I have to wonder though... what would super bright modern colors do for the look and would it resonate more to the 20-something generation?!  
My treasure from my mother in law's pile was a loosely woven fabric. I think it's 100% cotton - it feels super soft and light weight. The fabric is only a yard and I wish there was more! 
This photo has black behind the fabric to show the weave detail.

This photo has tan behind it to bring out more of the overall colors.

Tuesday, July 8, 2014

Sun Printing - Yippee!


After cycling on a lovely refurbished railroad bed last weekend I had a strong urge to sunprint! The canopy of leaves was that nice dappled mixture of greens and yellows with some blue peeking through. Some day I'm going to paint my bedroom ceiling those colors - so peaceful! I created a couple of pieces using those colors but then veered off track to use other colors and  further off track to a more typical approach to painting fabric. 

I used peony leaves that were ready to cut down for the season. I tend to wait to trim plants that have gone by until I'm ready for a sunprinting session. 

For this piece I crinkled damp fabric and took my 3" brush and shook and flicked the paint around until the surface was covered. I gave it one more misting of water to ensure the paint meandered into the folds of the fabric.

I was painting in front of a group of day lily's and used all the colors within my view!

My final painted piece of the day was a more typical approach using a broad strokes application with some fabric scrunching and salt. 
I hope you get a chance to get outside for some outdoor creativity! It's inspiring to be outside experiencing the view, sights and sounds of your community! For me it's a natural scene but others might be enjoying an urban vibe. Maybe I should challenge myself (and you!) to create fabric art in settings that are outside your typical environment?! Game on?

Monday, July 7, 2014

Dyed Artist Canvas!

My latest passion is dyeing artist canvas! I wash the fabric as soon as I get it which removes the sizing and leaves the fabric soft and pliable... just delicious to use! The prewash shrinks the fabric quite a bit which at first was a surprise but now that I know all is well! 

I've ice dyed as well as painted and sun printed the canvas and been happy with the results. I love cotton but the soft canvas has such a nice texture that I think it provides a cool uniqueness to a finished piece. 

 "Flowers at Play" is painted and appliqued. I mounted on canvas stretchers which is easy to do and a quick way to hang. 

Check out my Artist Canvas Fabric page for more finished fabrics!